Connecting to Advanced Computing Systems
Use a secure-shell (SSH) client to connect for secure, encrypted communication. From within UM’s secure network (UMiamiWireless connection on campus) or VPN, connect from:
Windows
Connect using a terminal emulator like PuTTY (www.putty.org)
Log into IDSC servers with the appropriate account credentials. Pegasus example:
username@pegasus2.ccs.miami.edu (optional username @ host)
22 (port)
SSH (connection type)
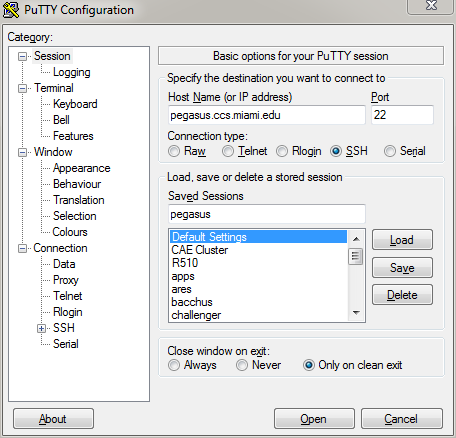
PuTTY in Windows
Mac and Linux
Connect with the Terminal program, included with the Operating Systems.
Log into IDSC servers with the approprite acount credentials. Pegasus example:
bash-4.1$ ssh username@pegasus2.ccs.miami.edu
username@pegasus.ccs.miami.edu’s password:
or SSH without account credentials to be prompted:
bash-4.1$ ssh pegasus2.ccs.miami.edu
login as: username
username@pegasus2.ccs.miami.edu's password:
To use SSH key pairs to authenticate, see Tutorial below: https://phoenixnap.com/kb/how-to-generate-ssh-key-centos-7
Using VS Code
In Visual Studio Code, open the command palette by pressing Ctrl+Shift+P (or Cmd+Shift+P on macOS). Then type and select: Remote-SSH: Open SSH Configuration File…, and choose your user’s SSH config file (typically located at ~/.ssh/config).
In the opened config file, add the following block (modify placeholders accordingly):
Host <preferred-host-alias>
    HostName pegasus2.ccs.miami.edu
    User <your-username>
Save and close the file. Note that the Host value is an alias you will use later to connect from VS Code.
Press Ctrl+Shift+P again. Search for and select: Remote-SSH: Connect to Host…. Then choose the alias you defined (e.g., pegasus). When prompted, enter your SSH password.
After successful connection, you can browse the remote file system directly within VS Code. You may be prompted for your password again when accessing directories outside your home directory.
Ensure you have the Remote - SSH extension installed in VS Code.
Forwarding the display with x11
To use graphical programs over SSH, the graphical display must be
forwarded securely. This typically requires running an X Window System
server and adding the -X option when connecting via SSH.
Download an X Window System server
For Windows, VcXsrv with the default installation options : https://sourceforge.net/projects/vcxsrv/
For Mac, XQuartz (OSX 10.8+) : http://www.xquartz.org/
_OS X versions 10.5 through 10.7 include X11 and do not require XQuartz._
Connect with X11 forwarding
Launch the appropriate X Window server before connecting to IDSC servers via SSH.
Windows: Configure PuTTY for X11 display forwarding
In PuTTY Configuration,
scroll to the Connection category and expand it
scroll to the SSH sub-category and expand it
click on the X11 sub-category
On the X11 Options Panel,
check “Enable X11 forwarding”
enter “
localhost:0” in the “X display location” text field
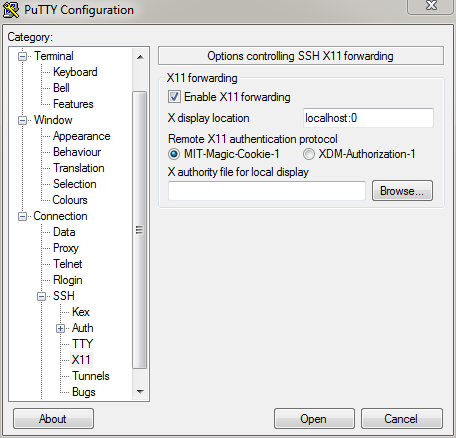
PuTTY X11
Mac: Connect with X11 flag
Using either the Mac Terminal or the xterm window, connect using the
-X flag:
bash-4.1$ ssh -X username@pegasus2.ccs.miami.edu
Launch a graphical application
Use & after the command to run the application in the background,
allowing continued use of the terminal.
[username@pegasus ~]$ firefox &
Connecting to IDSC Systems from offsite
Triton, Pegasus, and other IDSC resources are only available from within the University’s secure campus networks (wired or UMiamiWireless, CantNet_Wireless). To access IDSC resources while offsite, open a VPN connection first. IDSC does not administer VPN accounts.
University of Miami VPN: https://my.it.miami.edu/wda/a-z/virtual-private-network/
Send access range requests (for Vendor VPN applications) to : IDSC ACS
PLEASE NOTE: As of 2024, only UMIT provisoned hardware will be able to access the VPN off campus.